3 Tips For Improving Your Marching Band Audio
Setting up marching audio electronics is not a typical component of a music education degree. It is a complex system with many variable parts, and no program will have an identical setup from the setup stage all the way through mixing. But if you know the tools to bring out the tone of the amplified instruments and have the ear to mix them to the ideal level, your ensemble will blend in new and amazing ways.
Today, I want to share 3 tips for aspiring sound technicians in the marching arts (or band directors with no other option) that may help you get started on using your sound system to achieve balance across your ensemble.
Note: This blog is meant for directors or young aspiring sound technicians who are looking to improve their knowledge of sound equipment. I will skip over some nuance in favor of conveying understanding of tools & equipment. I’ll also add simplified startup tips in the “how I think about it” section at the end of each tip
Tip 1: Set Your Gain Before Your Volume
Do you want your amplified instruments to retain their tone? If so, this is probably the most important tip you’ll find in this blog. Find the dials (or single dial) on your board marked “gain”. Lots of people think gain is “loudness” and believe it is the same as the volume sliders (faders) that control loudness, but that is not exactly right.
Setting your gain level sets how loud something is before any processing from your system. What does that mean? In this helpful article on the difference between gain and volume, it is explained that volume set via gain affects the tone of the input. So before your instrument goes through any processing, before it is output via your speakers, higher gain means capturing more volume from your input. In contrast, volume simply controls the decibel level of the output.
How does knowing this help us? If you want an instrument to be louder and you turn up the gain, that means more and more input is coming through before any processing happens. If there is too much input, we get distortion and harsh sounds that your mixer cannot “fix” or assist. So in general, we’ll want to set our gain to a consistent level. One where the input volume is sufficient to hear the fullness of the instrument across its range, but not so much that tone gets distorted.
How I think about it:
Think of your gain as “power/ volume to tone”. On the channel you’re mixing, put your volume fader just below 0. Then (as the instrument your mic’ing is playing) turn your gain up until your sound is clear and the tone of the instrument is clear. If you begin to hear any distortion, turn the gain back down. Once this is set, don’t touch your gain for the rest of the season (or at least touch it sparingly).
Tip 2: Know the Range Your Are Mixing
Often, music educators mic front ensemble keyboards. These instruments typically have the widest range of any instrument you will mic. As you mic something like a flute soloist, the range becomes more limited (virtually no notes in low frequencies). Microphones pick up any noise that they capture, as of today, they are not smart devices that detect what we want them to. But we can get them a little closer to that.
Equalization (or EQ) is the process of adjusting specific frequencies in order to balance or maximize the sound you capture. A typical soundboard may have options to EQ sound from 20 hertz (very low) to 20,000hz (imperceptibly high for some). But a flute’s primary sounds lie within the 200hz to 5,000hz range (generally speaking, including overtones). Below you can see a chart that lists general frequency ranges for instruments.
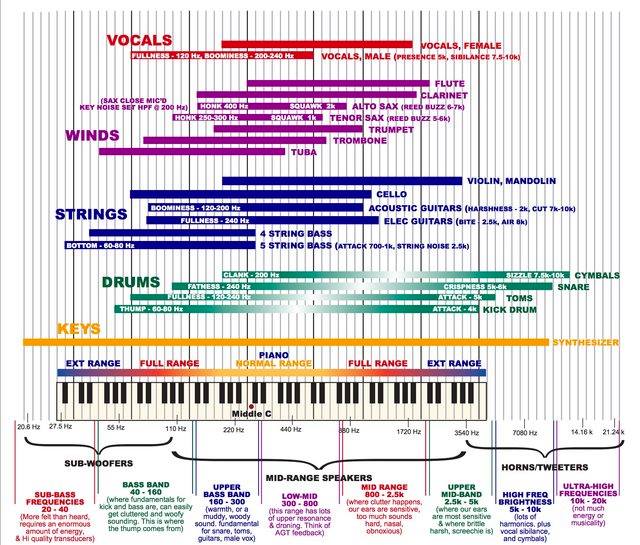
The EQ process varies depending on your soundboard. Analog will (typically) grant more limited options to EQ than digital. Back to our flute example, here’s an article that breaks down a good EQ for a flute solo. In general, articles like this are a great place to start EQ if you have not mixed an instrument before.
How I think about it:
Need to learn the basics of EQ? The how is different for every board: start with Google or Youtube and type in the name of your board + EQ. That will get you started.
Our goal is to make our instruments sound the most like themselves. Contrary to popular belief, we can’t really “improve” on mediocre sounds, we can simply bring out the right frequencies to make it sound as pure as possible. If you’re mixing an instrument for the first time, look it up online as well. You’ll find great starting points that way.
At the end of the day, use your ear and test as needed. You are working with high school musicians in an outdoor (often hot) setting. Some EQ adjustments may be needed. Keep testing and don’t stop until you are happy with the sound across the range of the instruments.
Tip 3: Get the Right Mics, not the Best Mics
You will be hard pressed to find a better microphone for micing your pit than the industry standard Shure SM57. It’s a great, versatile mic that captures the full range of the instrument. Several of the very best indoor percussion ensembles in the world use them. Can you find a microphone for your ensemble? Probably. Can you find one at anywhere near the same price? Probably not.
Will the SM57 work as an elusive “shotgun mic”? Less effectively. Maybe then you need the AT8035. But again, the AT8035 serves that specific purpose, you likely won’t get what you’re looking for mixing your pit with it or bringing a soloist up to the front to play on one.
Microphones are like surgeon’s tools. While one tool may be the best in the world at a specific task (like capturing a range of instruments at a distance), it may be rendered useless in a different scenario (micing a pit member). Just because you have a mic does not necessarily mean it will work for every situation. Do your research before you purchase a mic. If you’re struggling, reach out to a local university and see if they have someone happy to offer you audio advice. Know what you are buying before you buy it.
Go Forth and Mix
The challenge in writing an audio blog is that everyone needs different things for different situations. This blog is intentionally general, because going into specifics of each situation turns this into a 12,000 word blog. If you are interested in learning more about marching audio, check out the Marching Arts Audio Discussion on Facebook. It’s an invaluable resource for specific questions to like minded folks. Feel free to reach out to us if you have specific questions, we are happy to help or guide you in the right direction!


0 Comments